When your iPhone suddenly stops producing sound during calls, voice notes, or videos, it can be extremely frustrating. Even more, when these audio issues become frequent, many users start to wonder if the problem is related to the iPhone 14 Audio IC. This tiny but essential component is responsible for controlling the phone’s sound input and output. However, once it starts malfunctioning, you will begin noticing several symptoms that gradually worsen over time. Fortunately, with the right knowledge and step-by-step checks, you can accurately identify what’s causing the audio fault before seeking repair.
In this detailed guide, you will learn all the major iPhone 14 Audio IC symptoms, and more importantly, how to confirm the issue so you can take the right action immediately. Additionally, you’ll discover what to do before repairs, what to avoid, and how to protect your device from future IC-related failures.
iPhone 14 Audio IC Symptoms – Understanding the Warning Signs Early
Because the iPhone 14 Audio IC symptoms often begin subtly, many users overlook them. However, recognizing the signs early is crucial since they usually worsen over time. Furthermore, Apple devices depend heavily on the logic board audio circuits, making IC problems more noticeable.
Below are the most common signs your iPhone may be experiencing Audio IC failure.
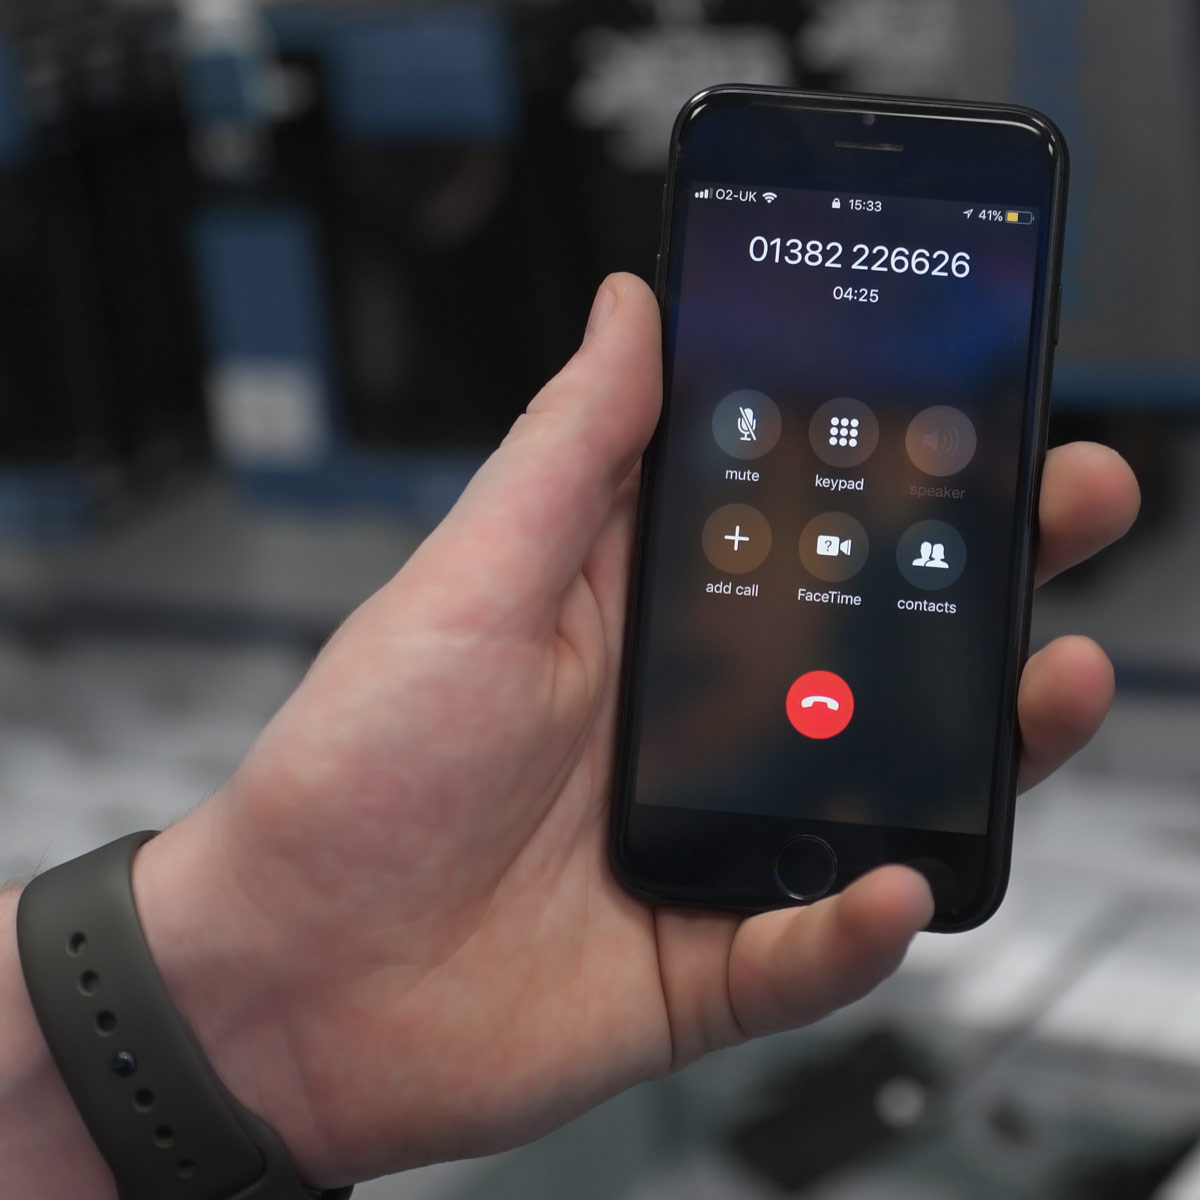
“No Sound During Calls” – A Major iPhone 14 Audio IC Symptom
One of the first and most common iPhone 14 Audio IC symptoms is the inability to hear sound during regular or FaceTime calls. Even though the phone may connect normally, you may notice:
- No audio from the earpiece
- Muffled or extremely low volume
- Intermittent sound loss
Moreover, the person on the other end may also not hear you, indicating potential IC damage affecting both input and output circuits.
“Speaker Greyed Out” – A Direct Sign of Audio IC Fault
If your in-call speaker button appears greyed out, this is one of the clearest iPhone 14 Audio IC symptoms. The phone does this because it cannot detect the audio amplifier pathways, which often fail when the IC is damaged.
Additionally, this issue continues even after restarting or updating the device, confirming a deeper logic board fault.
“Voice Memos Not Recording” – A Common Audio IC Warning
Another key iPhone 14 Audio IC symptom appears when the Voice Memos app cannot start recording or shows an error. Since audio IC controls microphone circuits, failing to capture audio is a major confirmation.
Try opening the app; if it does not record or crashes immediately, it is often an Audio IC-related problem.
“Boot Loop with Apple Logo” – Advanced Audio IC Failure
Surprisingly, Audio IC issues can sometimes cause the device to restart repeatedly. Although this is less common in the iPhone 14 series compared to older models, it still happens when the IC communication line becomes unstable.
Thus, if your phone gets stuck on the Apple logo after a call or audio task, the iPhone 14 Audio IC symptoms are likely progressing.
“Mic Not Working Across Apps” – Cross-Platform Audio IC Symptoms
Additionally, another clear indication is when the microphone stops functioning across multiple apps such as:
- Camera
- Messenger
- Zoom
- Telegram
When this happens across all apps, rather than just one, it indicates hardware—not software—failure.
How to Confirm iPhone 14 Audio IC Issue – Step-by-Step Diagnosis
Now that you understand the warning signs, it’s equally important to learn how to confirm the issue. While some symptoms may appear due to software glitches or dirt buildup, the following checks will help you identify whether it is truly an IC failure.
Step 1 – Restart and Update to Eliminate Software Problems
Before assuming serious damage, you should restart your phone. Moreover, updating to the latest version of iOS is essential because audio bugs are often fixed through patches.
Even though this may not fix severe issues, it eliminates software-related causes, helping you confirm iPhone 14 Audio IC symptoms more accurately.
Step 2 – Try Voice Memos to Confirm Audio IC Failure
Open the Voice Memos app and try recording a short clip. If it does not record, produces no waveform, or displays an error message, this almost always confirms an IC-related malfunction.
Thus, Voice Memos is one of the most effective tools for diagnosing iPhone 14 Audio IC symptoms.
Step 3 – Test the Microphone in Multiple Apps
Additionally, checking the microphone in different applications helps you determine whether the fault is universal.
Try using:
- Camera app (record with sound)
- WhatsApp voice notes
- Instagram voice messages
If all of them fail, it strongly supports the presence of iPhone 14 Audio IC symptoms.
Step 4 – Check the Speaker Button During Calls
Place a call and observe the speaker button. If it remains greyed out or does not toggle on, this is one of the strongest indicators of Audio IC damage.
Therefore, this test is essential when confirming iPhone 14 Audio IC symptoms.
Step 5 – Run a Hardware Diagnostics Test
For a more technical confirmation, you can run Apple’s built-in diagnostics using the Support app or at an Apple Store. Although results vary, repeated microphone or speaker hardware errors confirm the IC fault.
When multiple sections fail, it becomes highly likely that the iPhone 14 Audio IC symptoms stem from logic board damage.
Causes Behind iPhone 14 Audio IC Failure – Why the Issue Occurs
Understanding what causes the failure helps prevent future damage. While the iPhone 14 is built with improved board reinforcements, it’s still sensitive to:
Moisture Exposure
Even minor liquid exposure can corrode IC solder points, gradually causing iPhone 14 Audio IC symptoms.
Physical Impact or Bending
Dropping the phone or bending it (especially without a case) stresses the IC’s connections.
Overheating
Prolonged thermal stress weakens the IC solder and leads to intermittent audio failures.
Manufacturing Weakness
Although rare in newer models, some devices develop IC instability over time.
What Not to Do When You Notice iPhone 14 Audio IC Symptoms
When experiencing malfunction, avoid actions that worsen the issue:
- Do not keep restarting repeatedly
- Do not install random audio apps
- Do not press the phone to force sound
- Do not expose it to more heat
- Do not attempt DIY board repairs
These actions can worsen iPhone 14 Audio IC symptoms, making repair more complicated.
Repair Options – How Audio IC Issues Are Fixed
When the Audio IC fails, professional repair is necessary. Since the IC is soldered to the logic board, only trained technicians should handle it.
The repair typically involves:
- Removing the Audio IC
- Reballing damaged solder pads
- Installing a new IC with proper bonding
- Running post-repair diagnostics
This process restores full sound and mic functionality.
For safe and reliable repair, Milaaj Mobile and Laptop Repair Dubai offers specialized logic board-level solutions for iPhone Audio IC problems.
How to Prevent Future iPhone 14 Audio IC Symptoms
To protect your device:
- Always use a shockproof case
- Avoid moisture or humidity
- Do not overheat the device
- Update iOS regularly
- Handle the phone gently
FAQs
1. What are the most common iPhone 14 Audio IC symptoms?
Common symptoms include no sound during calls, microphone failure, speaker greyed out, Voice Memos not recording, and audio interruptions across apps.
2. Can software updates fix iPhone 14 Audio IC symptoms?
Sometimes minor bugs clear after an update, but true Audio IC issues are hardware-related and require professional repair.
3. Why does the speaker button turn grey during calls?
When the speaker button is greyed out, the phone cannot detect the audio pathway—this is a classic sign of Audio IC failure.
4. How do I confirm if my iPhone 14 has Audio IC damage?
Testing Voice Memos, checking call audio, reviewing microphone performance across apps, and observing boot loops are key confirmation methods.
5. Can iPhone 14 Audio IC problems get worse over time?
Yes. Once the solder points weaken, the symptoms progress—affecting calls, recordings, and overall audio performance.
6. Where can I repair iPhone 14 Audio IC issues in Dubai?
You can visit Milaaj for expert logic board-level Audio IC repair.
Conclusion
Experiencing iPhone 14 Audio IC symptoms can be stressful, especially when you depend on your device daily. However, by recognizing early signs, running the right tests, and confirming whether it’s a software or hardware issue, you can take timely action. If the issue is indeed Audio IC-related, professional repair is the safest and most effective solution. With proper care and precautions, you can prevent recurrence and keep your iPhone functioning flawlessly.
Get professional iPhone repair services with expert technicians ensuring top-quality results.
Enjoy quick and reliable home delivery for your repaired or purchased devices.
Sell your old iPhone with confidence and get the best value instantly.
📍 Visit Any Milaaj Branch in Dubai
🔹 Bur Dubai
Milaaj Mobile and Laptop Repair Dubai
📞 055 258 8477
🔗 Google Maps
🔹 Al Barsha
Milaaj Mobiles and Laptop Repair Al Barsha
📞 052 596 2846
🔗 Google Maps
🔹 Reef Mall (Salah Al Din)
Milaaj Service Center Reef Mall
📞 052 3405 814
📍 1st Floor, Shop 16, Deira
🔗 Google Maps
🔹 Al Nuaimiya
Milaaj Mobiles and Laptops Ajman
📞 055 788 9654
🔗 Google Maps
📧 Email: support@milaaj.com
🕒 Operating Hours: Monday – Sunday
Leave a Reply